
Photo by EasyCloudify
How to Deploy a Next.js App on EasyCloudify (DockerHub, GitHub & Templates)
Shipping a Next.js app should not require a weekend of YAML, IAM policies, and Stack Overflow tabs. EasyCloudify is a fully managed cloud PaaS that takes care of the boring parts - provisioning, SSL, scaling, logs, redeploys - so you can focus on the code. In this tutorial you'll learn three ways to deploy Next.js EasyCloudify apps: from a DockerHub image, straight from a GitHub repository, and from the official one-click starter template. By the end you'll have a live, HTTPS-secured Next.js app on a *.easycloudify.com subdomain, with automatic redeploys wired up.
This is a hands-on, screen-share style guide. Open EasyCloudify in one tab, your editor in another, and follow along.
Table of Contents
- Deployment Methods Overview
- Method 1 - Deploy from DockerHub
- Method 2 - Deploy from GitHub (Source Code)
- Method 3 - One-Click Template
- Domains, Subdomains & SSL
- Managing Your App
- Conclusion
Deployment Methods Overview
EasyCloudify gives you three first-class paths to production. Pick the one that matches how your team already works.
| Method | Best for | Public/Private | Auto-redeploy | Setup time |
|---|---|---|---|---|
| DockerHub image | Custom Dockerfiles, multi-stage builds, monorepos, polyglot stacks | Both (private repos require a DockerHub access token saved in Cloudpanel -> Keys) | GitHub -> DockerHub builds automatically; redeploy on EasyCloudify is one click | ~10 min |
| GitHub source | Standard Next.js apps where you want zero-config CI/CD | Both (private repos are auto-imported to the EasyCloudify GitHub org during deploy) | Yes - every push to the selected branch triggers a fresh build (deploy_on_push: true) | ~3 min |
| Template (one-click) | Brand-new projects, prototypes, demos | Public starter, your fork can be either | Yes - inherits the GitHub flow once forked | ~30 sec |
All three methods give you the same managed runtime: automatic SSL, a free easycloudify.com subdomain, log streaming, metrics, autoscaling, and a real human at the end of a support ticket.
Method 1 - Deploy from DockerHub
This is the most flexible path. You own the Dockerfile, you own the build, and EasyCloudify just runs the image. It's also the path most teams use once they have an existing CI pipeline. This is a clean Next.js Docker deployment with full control over the runtime image.
a. Create a DockerHub account and a repository
- Head to https://hub.docker.com and sign up. The free tier is plenty for a single Next.js app.
- Click Create Repository.
- Name it
nextjs-app. - Choose Public if you're fine with the world seeing your built image, or Private if your image bundles internal code or build-time secrets. Both work on EasyCloudify; private adds one extra step you'll handle in section (d).
- Click Create.
You now have a repository at yourusername/nextjs-app ready to receive image pushes.
b. Connect GitHub to DockerHub for automatic builds
DockerHub can build your image for you whenever you push to GitHub, so you never have to run docker build && docker push from your laptop again. The exact same flow works whether your GitHub repo is public or private - you authorize DockerHub to read it via OAuth, so DockerHub gets the same access your account has.
- In your DockerHub repo, click the Builds tab.
- Click Link to GitHub (under Source provider) and authorize the integration. When the GitHub OAuth screen appears, grant access to the organization or account that owns the Next.js repo. This is the step that makes private GitHub repos visible to DockerHub.
- Back in DockerHub, pick the GitHub repository that holds your Next.js code. Private repos appear in the dropdown automatically once OAuth is approved.
- Add a build rule:
- Source type: Branch
- Source:
main - Docker tag:
latest - Dockerfile location:
/Dockerfile - Build context:
/ - Autobuild: ON
- Save the rule.
From this point on, every git push origin main triggers DockerHub to build a fresh image and tag it latest. No CI yaml required, and your source code never leaves the GitHub <-> DockerHub channel.
c. The Dockerfile
Drop this file at the root of your Next.js project. It is intentionally minimal - readable, cache-friendly, and small.
dockerfileFROM node:24-alpine AS base-alpine WORKDIR /usr/src/app # Upgrade to latest npm RUN npm install -g npm@latest COPY package*.json ./ RUN npm cache clean --force RUN npm install COPY . . RUN npm run build CMD ["npm", "start"]
Why each line matters:
FROM node:24-alpine AS base-alpine- Alpine Linux ships a Node.js image around 50 MB versus ~350 MB for the Debian-based default. Smaller images mean faster pulls, faster cold starts on EasyCloudify, and less attack surface. The named stage (base-alpine) leaves room to extend into a multi-stage build later without rewriting.WORKDIR /usr/src/app- sets and creates the working directory in one step. Every following instruction runs from here.RUN npm install -g npm@latest- pins you to the newest npm so lockfile resolution andnpm cisemantics are predictable.COPY package*.json ./beforeCOPY . .- this is the single most important caching trick. Docker hashes each instruction; as long aspackage.jsonandpackage-lock.jsonhaven't changed, the expensivenpm installlayer is reused from cache. If you copied the whole project first, every source-code change would invalidate the install layer and force a full reinstall.RUN npm cache clean --force- keeps the resulting image lean by discarding the npm download cache that's no longer needed inside the running container.RUN npm install- installs dependencies. For stricter reproducibility you can swap this fornpm ci.COPY . .- pulls in the rest of the source. Pair it with a.dockerignorethat excludesnode_modules,.next,.git, and.env*files so you don't ship secrets or fight against a stale build cache.RUN npm run build- runsnext build, producing the optimized.nextdirectory.CMD ["npm", "start"]- boots the Next.js production server, which by default listens on port3000. Remember that port - you'll plug it into EasyCloudify next.
Layer ordering is the difference between a 4-second incremental build and a 4-minute one. Keep dependency declarations above source code, and rebuilds stay snappy.
d. Deploy on EasyCloudify from DockerHub
Once DockerHub has built yourusername/nextjs-app:latest, switch to EasyCloudify.
d.1 Save your DockerHub registry credentials (required for private images, recommended for public)
EasyCloudify needs an authenticated way to pull your image. Even for public repos, saving credentials avoids DockerHub's anonymous pull rate limits.
- On DockerHub, go to Account Settings -> Security -> Personal Access Tokens -> Generate new token. Give it a name like
easycloudify-deployand the Read-only permission scope. Copy the token - you won't see it again. - In EasyCloudify, open Cloudpanel -> Keys (
/cloudpanel/keys).
- Click Add Credentials and fill in:
- Service:
Docker Hub - Username: your DockerHub username
- Personal Access Token: the access token you just generated
- Service:
- Save. The credential is stored encrypted and shows up automatically in the deploy wizard.
d.2 Run the deploy wizard
- Open the Cloudpanel and click Create.
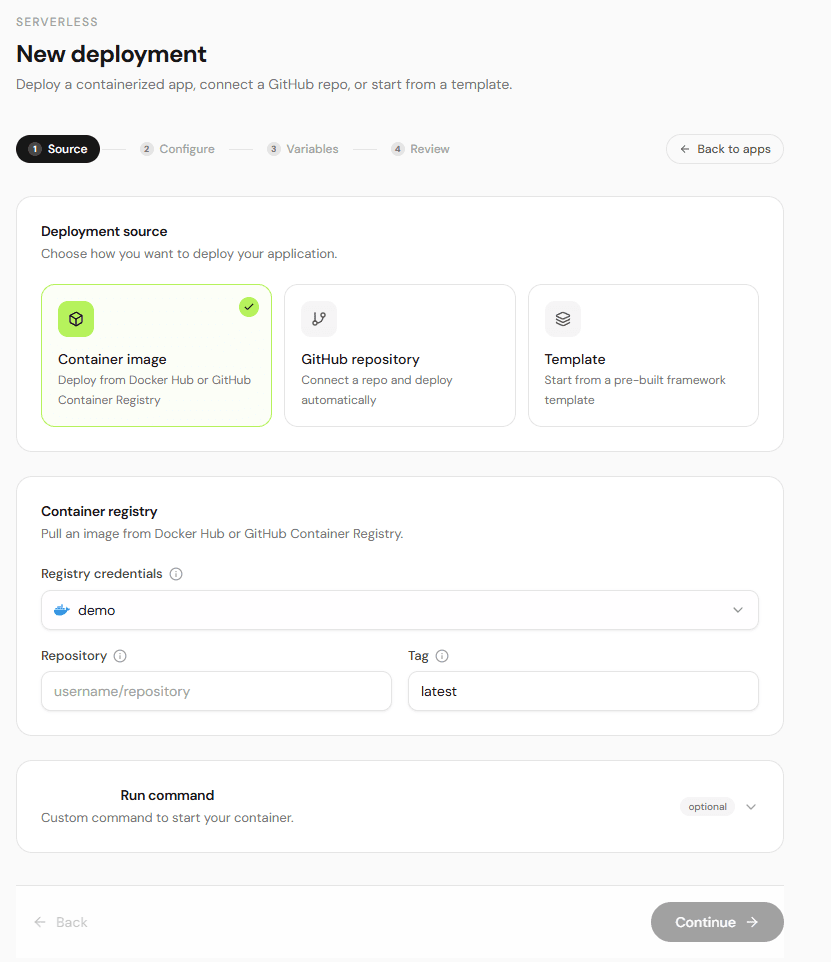
- Step 1 - Source: pick Container Image, then the credential you saved in d.1 is selected automatically; if you have several saved, pick the right one from the dropdown.
- Enter the repository:
yourusername/nextjs-app. Set taglatest. - Step 2 - Configure:
- App name:
my-nextjs-app(this becomes part of the public URL) - Region: pick the one closest to your users
- Plan & instance count: start with one instance on the Start plan; you can scale later
- HTTP port:
3000 - HTTP route:
/
- App name:
- Step 3 - Environment Variables: add anything Next.js needs at runtime -
NEXT_PUBLIC_API_URL,DATABASE_URL, etc. Choose the scope (RUN_TIME,BUILD_TIME, or both). Sensitive values are masked. - Step 4 - Review & Deploy: verify and click Deploy.
The build/deploy pipeline runs in the background. After a couple of minutes the app status flips to Active and a my-nextjs-app.easycloudify.com subdomain is provisioned automatically with SSL - see the Domains, Subdomains & SSL section.
e. Updating the app
The update loop is simple:
bashgit add . git commit -m "Update homepage hero" git push origin main
DockerHub picks up the push, rebuilds the image, and tags it latest. Back in the EasyCloudify dashboard, open your app and click Pull New Changes in the actions menu. EasyCloudify pulls the freshly built image and rolls out a zero-downtime deployment. You can watch the phases - PENDING_BUILD, BUILDING, DEPLOYING, ACTIVE - in the Activity tab.
Method 2 - Deploy from GitHub (Source Code)
If you don't want to maintain a Dockerfile, hand the repo to EasyCloudify and let it do the build for you. This is the fastest way to deploy Next.js from GitHub with continuous deployment baked in. Public and private repositories are both supported - for private repos, the deploy wizard auto-imports the repo into the EasyCloudify GitHub organization the first time you deploy it, which is what allows the build runner to clone your code on every push.
a. Push the project to GitHub
bashgit init git add . git commit -m "Initial Next.js app" git branch -M main git remote add origin [email protected]:yourusername/my-nextjs-app.git git push -u origin main
A standard Next.js project (created with create-next-app) needs no special tweaks. EasyCloudify auto-detects the framework.
b. Create the app on EasyCloudify
- In the Cloudpanel click New App.
- Step 1 - Source: pick GitHub. If this is your first time, you'll be prompted to install the EasyCloudify GitHub App on the org or account that owns the repo. Authorize it. For private repos, make sure you grant access to the specific repository (or to All repositories if you prefer); without that grant the repo won't appear in the picker.
- Pick the repository (
my-nextjs-app) and the branch (main). The framework field auto-fills as Next.js. If the repo is private, you'll see a brief "Importing private repository to organization..." toast - that's the auto-import in action. - Step 2 - Configure: name, region, plan, instance count, HTTP port (
3000), and route. Optional: enable Autoscaling with a CPU threshold and a max instance count. - Step 3 - Environment Variables: same as before - runtime, build-time, or both.
- Step 4 - Review & Deploy.
Behind the scenes EasyCloudify creates an app spec with deploy_on_push: true. That single flag is the whole CI/CD story.
c. Redeploy after updates
Two options:
- Automatic (default): every push to
maintriggers a new build and rollout. No buttons, no scripts. You commit, EasyCloudify deploys. - Manual: open the app, click Pull New Changes, and choose Sync and Deploy. Useful when you need to force-rebuild without changing code (for example, after rotating a secret).
Build and deploy logs are streamed live in the Activity tab - open it during your first deploy so you can see what EasyCloudify is doing on your behalf.
Method 3 - One-Click Template
For a brand-new project, the fastest path is the official EasyCloudify Next.js starter:
You have three ways to use it:
- Use this template - open the GitHub page and click the green Use this template button. GitHub creates a fresh repository under your account, pre-wired with a working Next.js 15 app, a
Dockerfile, sensiblenext.config.js, and.dockerignore. From there, follow Method 2 to deploy it. - Clone locally - if you'd rather start offline:
When you're ready, push to your own GitHub repo and connect it via Method 2.bashgit clone https://github.com/EasyCloudify/nextjs-starter.git my-app cd my-app npm install npm run dev - Deploy directly from EasyCloudify's template picker - in Step 1 - Source of the deploy wizard, pick Templates and select Next.js Starter from the Frontend category. EasyCloudify forks the repo for you, pre-fills the framework, branch, and run command, and skips you straight to Step 2 - Configure.
After deployment the starter is live immediately at its .easycloudify.com URL with zero configuration. It's the lowest-friction way to confirm your account, region, and plan before pointing real traffic at it.
Domains, Subdomains & SSL
The free easycloudify.com subdomain
The moment your deploy succeeds, EasyCloudify provisions a primary subdomain for the app - automatically, with no buttons to click and no DNS to configure:
- URL format:
your-app-name.easycloudify.com(whatever you typed as the app name in Step 2 of the wizard). - SSL: issued and renewed automatically. No Certbot, no DNS challenge, no expiry calendar.
This is set in the app spec at deploy time as the PRIMARY domain, and EasyCloudify owns the easycloudify.com zone, so the CNAME and certificate provisioning happen end-to-end without you. Use this URL for staging, demos, or as your permanent URL - it's a real, production-grade endpoint.
Adding a custom domain (the EasyCloudify way)
When you're ready to use your own domain, the workflow is deliberately simpler than at most providers: you don't add CNAMEs at your registrar. Instead, you let EasyCloudify host your DNS, then add the alias from inside the app.
Step 1 - Add your domain to EasyCloudify Zones
- In the Cloudpanel, open DNS Management (
/cloudpanel/domains). - Click Add Zone and enter your root domain, for example
yoursite.com. - EasyCloudify creates the zone in Cloudflare on your behalf and shows you a pair of nameservers (something like
aria.ns.cloudflare.comandbob.ns.cloudflare.com). - Log in to your registrar (Namecheap, GoDaddy, Gandi, Porkbun...) and replace the existing nameservers with the two EasyCloudify gave you.
- Wait for propagation. It's usually a few minutes; occasionally up to 24 hours. Once Cloudflare reports the zone as Active, you can manage every DNS record for
yoursite.comfrom the EasyCloudify dashboard.
Step 2 - Add the alias from your app's settings
- Open your app in Cloudpanel -> Serverless -> [Your App].
- Click Edit Settings in the actions menu and expand the Alias domain field.
- Type the hostname you want -
app.yoursite.com,www.yoursite.com, or the apexyoursite.comitself. - Save. Because EasyCloudify already manages your zone, it creates the right CNAME record in your zone automatically - no copy-pasting record values, no registrar tab. The alias is added to the app spec as a
type: ALIASdomain, and a fresh SSL certificate is provisioned for it within a couple of minutes.
That's it. The same flow works for any subdomain, and for the apex domain.
Heads up - only EasyCloudify-managed zones are supported as aliases. Because the alias mechanism writes a CNAME directly into the zone, your domain must be added to Cloudpanel -> DNS Management first. If you keep DNS at another provider, EasyCloudify can't auto-create the record on your behalf.
Managing Your App
The management dashboard for each app is organized into four tabs designed to give you everything you'd want from a managed cloud PaAS Next.js setup, without ever opening a server:
- Overview - at-a-glance config: source (image or repo+branch), HTTP port, route prefix, environment variable count, health check setup, and run command.
- Insights - CPU, memory, and restart-count graphs over selectable ranges (1h, 6h, 24h, 7d, 30d). Useful for sanity-checking before you scale up.
- Activity - every deployment with its phase (
PENDING_BUILD,BUILDING,DEPLOYING,ACTIVE,ERROR), who or what triggered it, and full build/deploy logs (last 500 lines, downloadable). - Runtime Logs - live
stdout/stderrfrom your running Next.js process. Search and filter as you go.
A few common tasks:
- Edit environment variables: Settings -> Environment Variables -> edit -> Save. EasyCloudify rolls out a new revision automatically.
- Scale up: Settings -> Resources -> bump instance count, or enable autoscaling with a CPU threshold (e.g. scale up when CPU > 70%, max 5 instances).
- Manual redeploy: actions menu -> Pull New Changes. For GitHub apps, this syncs the latest commit; for container apps, it pulls the latest image tag.
- Destroy: actions menu -> Destroy App. Two-step confirmation prevents accidents.
This is the entire point of an EasyCloudify tutorial: the platform takes care of the runtime so the only thing on your TODO list is the next feature.
Conclusion
You now have three reliable ways to ship Next.js to production on EasyCloudify:
- DockerHub when you want full control over the image.
- GitHub source when you want zero-config CI/CD.
- The starter template when you want to be live in under a minute.
All three give you automatic SSL, a free subdomain, custom domain aliases, scaling, logs, and metrics out of the box - no DevOps team required. Grab the starter, push the button, and watch it go live:
Happy shipping.
Glossary
A quick reference for the EasyCloudify and Next.js terms used throughout this EasyCloudify tutorial. Bookmark it - it doubles as a checklist when you ship your next app.
- deploy Next.js EasyCloudify - the end-to-end workflow covered in this guide. Whether you choose a DockerHub image, the GitHub source path, or the one-click starter, the goal is the same: deploy Next.js EasyCloudify apps to a managed runtime in minutes, with no DevOps work on your side.
- Next.js Docker deployment - any path that ships your app as a container image rather than as raw source. A Next.js Docker deployment gives you bit-for-bit reproducibility between your laptop, CI, and the EasyCloudify runtime.
- deploy Next.js from GitHub - the zero-Dockerfile path. To deploy Next.js from GitHub, you connect the EasyCloudify GitHub App, pick a repo and branch, and let EasyCloudify build the image for you on every push.
- managed cloud PaaS Next.js - the category EasyCloudify belongs to. A managed cloud PaaS Next.js platform handles the OS, the runtime, SSL, scaling, and rollbacks so you only ship application code.
- EasyCloudify tutorial - this article, plus the official docs and the starter repo. Treat the EasyCloudify tutorial track as your shortest path from
create-next-appto a live URL. - Container Image - the source type you pick in Step 1 of the deploy wizard when you bring your own image. Selecting Container Image tells EasyCloudify to skip the build step and pull a prebuilt artifact from DockerHub or another registry.
- registry credentials - the username + access token pair EasyCloudify uses to authenticate to a container registry. Registry credentials live in Cloudpanel -> Keys, are stored encrypted, and are reusable across multiple apps.
- private repository - any GitHub or DockerHub repo that isn't public. EasyCloudify supports a private repository on either side: for DockerHub, save registry credentials; for GitHub, grant the EasyCloudify GitHub App access to the private repository.
- EasyCloudify GitHub App - the GitHub App you install when you choose GitHub as a source. The EasyCloudify GitHub App is what makes private-repo cloning, branch detection, and
deploy_on_pushwork end-to-end. - EasyCloudify Zones - the built-in DNS feature at Cloudpanel -> DNS Management. EasyCloudify Zones host your domain on Cloudflare's network and let the platform create the alias CNAME for you instead of asking you to log in to your registrar.
- Runtime Logs - the live
stdout/stderrstream of your running container, surfaced in the Runtime Logs tab of the management dashboard. Open Runtime Logs whenever you're debugging a 500 in production. - auto-redeploy - the behavior that turns every commit into a release. With auto-redeploy enabled (default for the GitHub source method), EasyCloudify rebuilds and rolls out the new revision the moment you push.
Filed under
ServerlessStay up to date on cloud computing
Get product updates, tutorials, and DevOps insights delivered to your inbox. No spam, unsubscribe at any time.